Yixia API User Guide
Official Website: https://api.yixia.ai
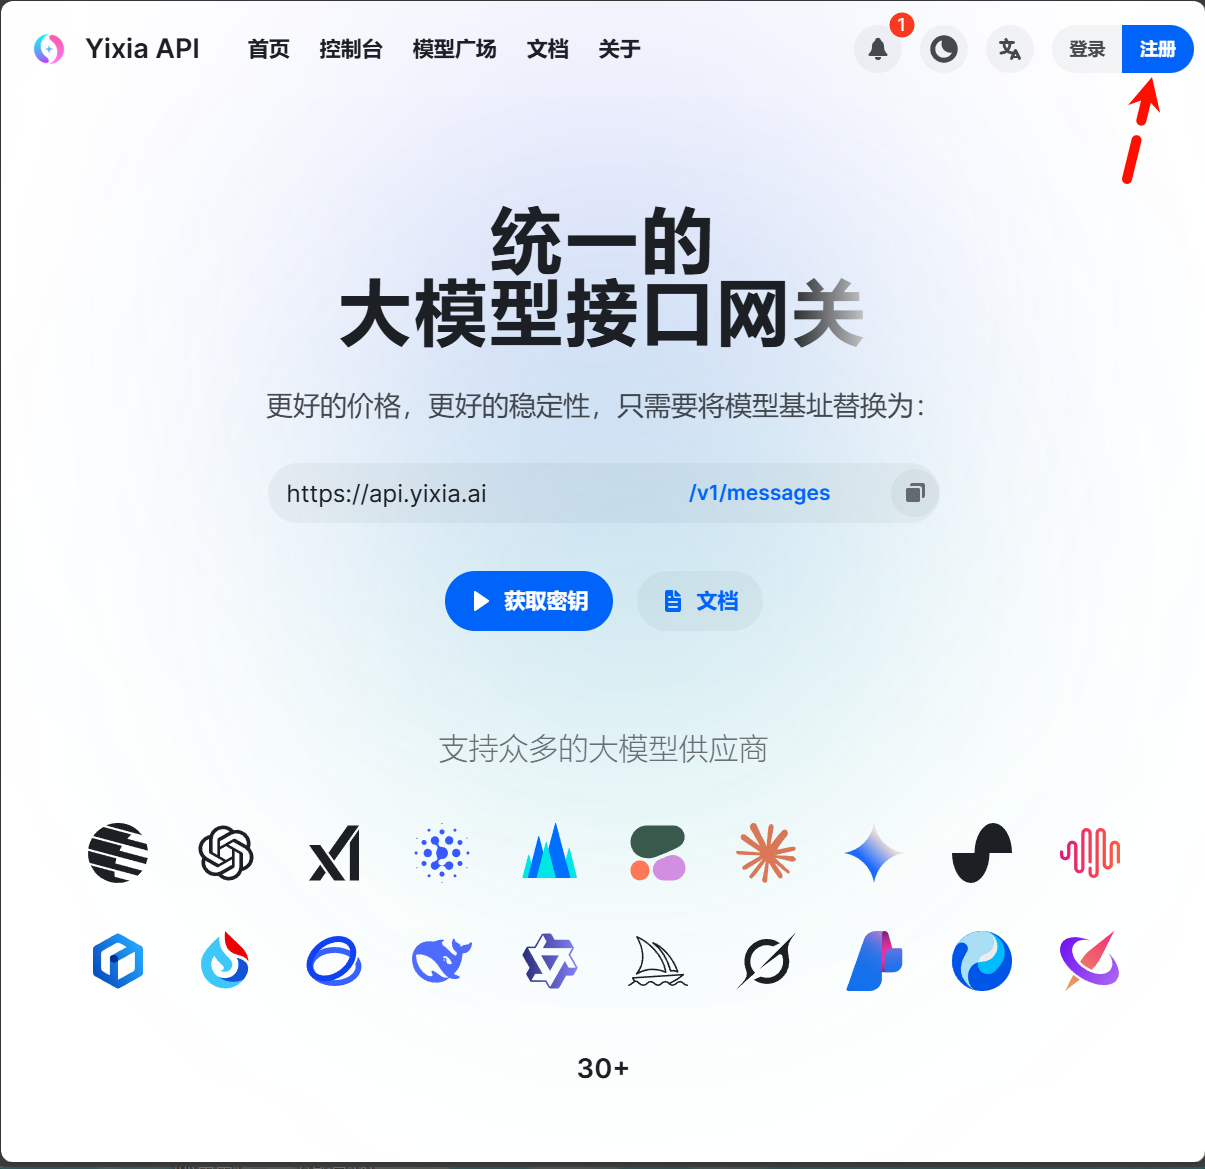
1. Create an Account
- Visit the Official Website
- Click the "Register" button in the upper right corner to create a new account
- Fill in the necessary registration information to complete the registration
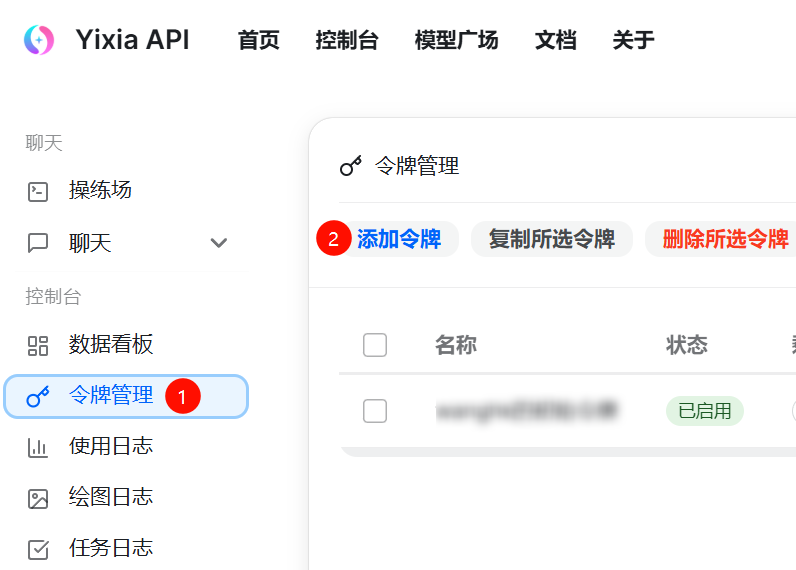
2. Create a token
- After successful login, click "Token Management" in the left menu bar to enter the token management page
- Click the "Add Token" button
- Enter the token name, select the default group, check for unlimited limit, and click the "Submit" button
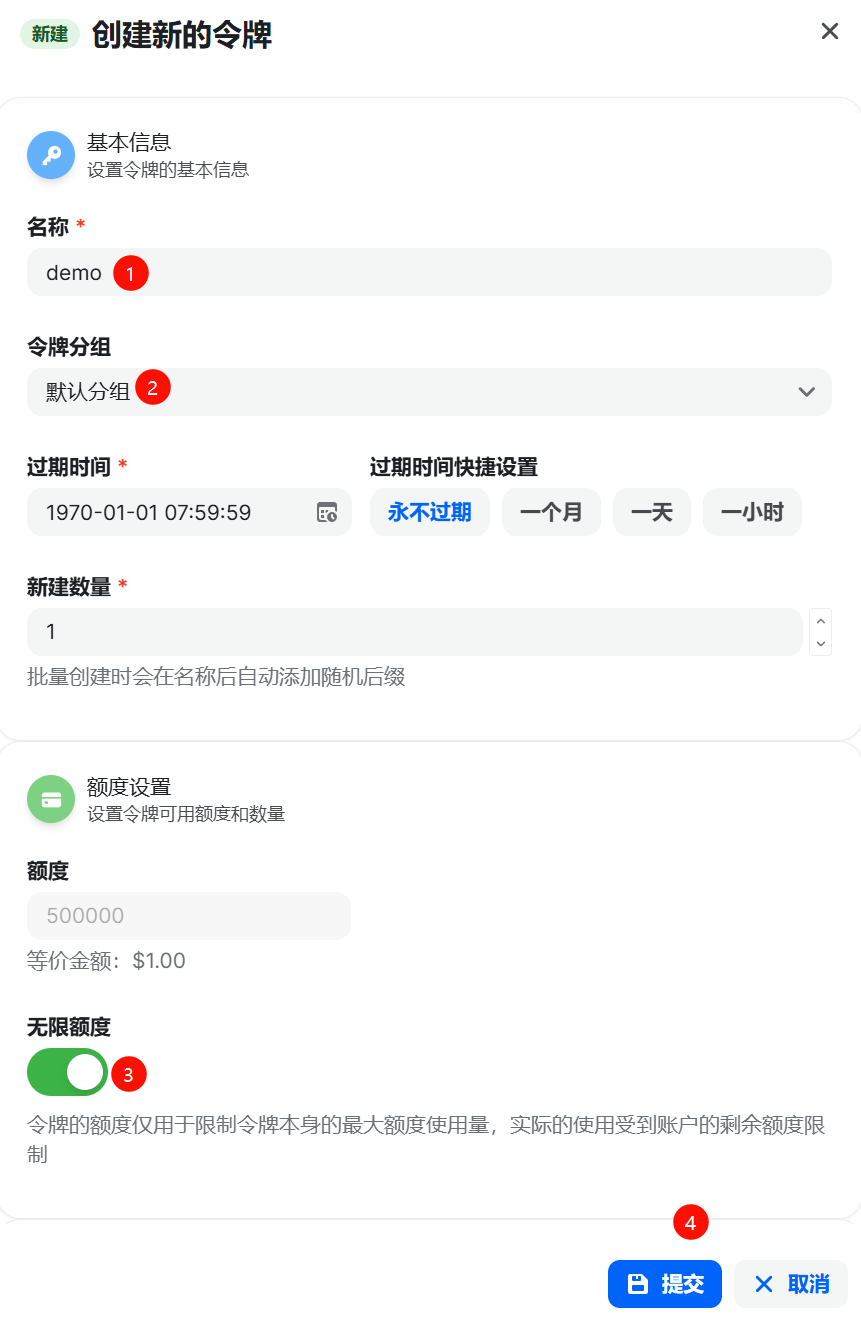
- Generate and copy your API key

At this point, you will have the following token and address:
API Key: sk-xxxxxx
Base URL: https://api.yixia.ai
3、Use the token
3.1 Use Chery Studio
- Use Chery Studio:
官网: https://www.cherry-ai.com/
Github: https://github.com/CherryHQ/cherry-studio
Gitee: https://gitcode.com/CherryHQ/cherry-studio
Docs: https://docs.cherry-ai.com/
Cherry Studio is a comprehensive AI assistant platform that integrates multiple model conversations, knowledge base management, AI 绘画, translation, and other functions. With its highly customizable design, powerful extension capabilities, and user-friendly experience, Cherry Studio is the ideal choice for professional users and AI enthusiasts. Whether you are a beginner or a developer, you can find suitable AI functions in Cherry Studio to enhance your work efficiency and creativity.
- Download the installation package for your system, follow the prompts to complete the installation.
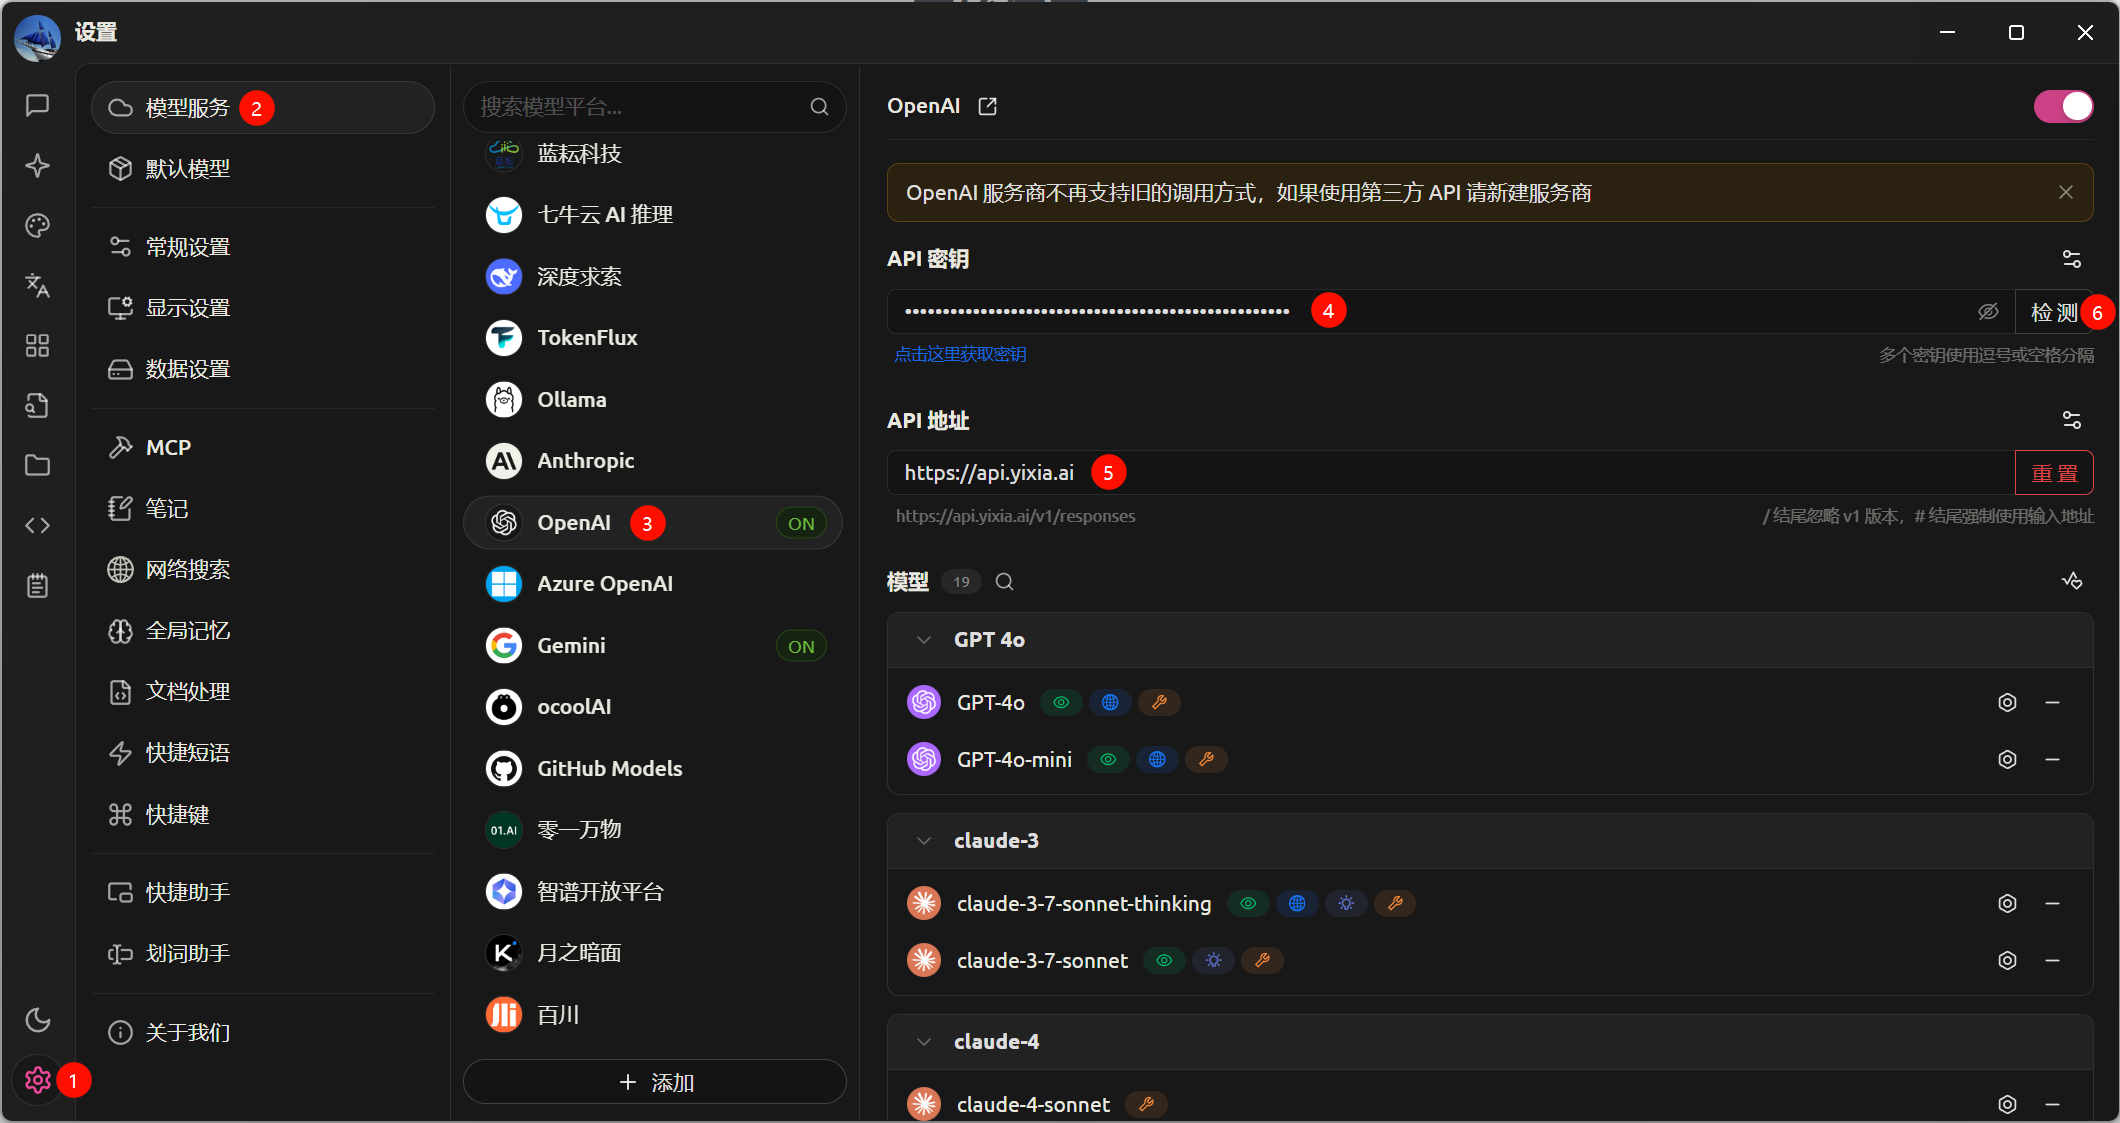
- Usage: In Cherry Studio, click the "⚙️" button in the lower left corner, select the "Model Services" tab, choose the "OpenAI" provider, paste the API key, enter the API address, click the "Test" button, and then click the "Manage" button at the bottom. Check the desired models in the box.

3.2 Using chatbox

官网: https://chatboxai.app/zh
Github: https://github.com/chatboxai/chatbox
Docs: https://docs.chatboxai.app/
Chatbox AI is an AI client application and smart assistant that supports numerous advanced AI models and APIs, available on Windows, MacOS, Android, iOS, Linux, and web versions.
- Download the appropriate installation package for your system, follow the prompts to complete the installation.
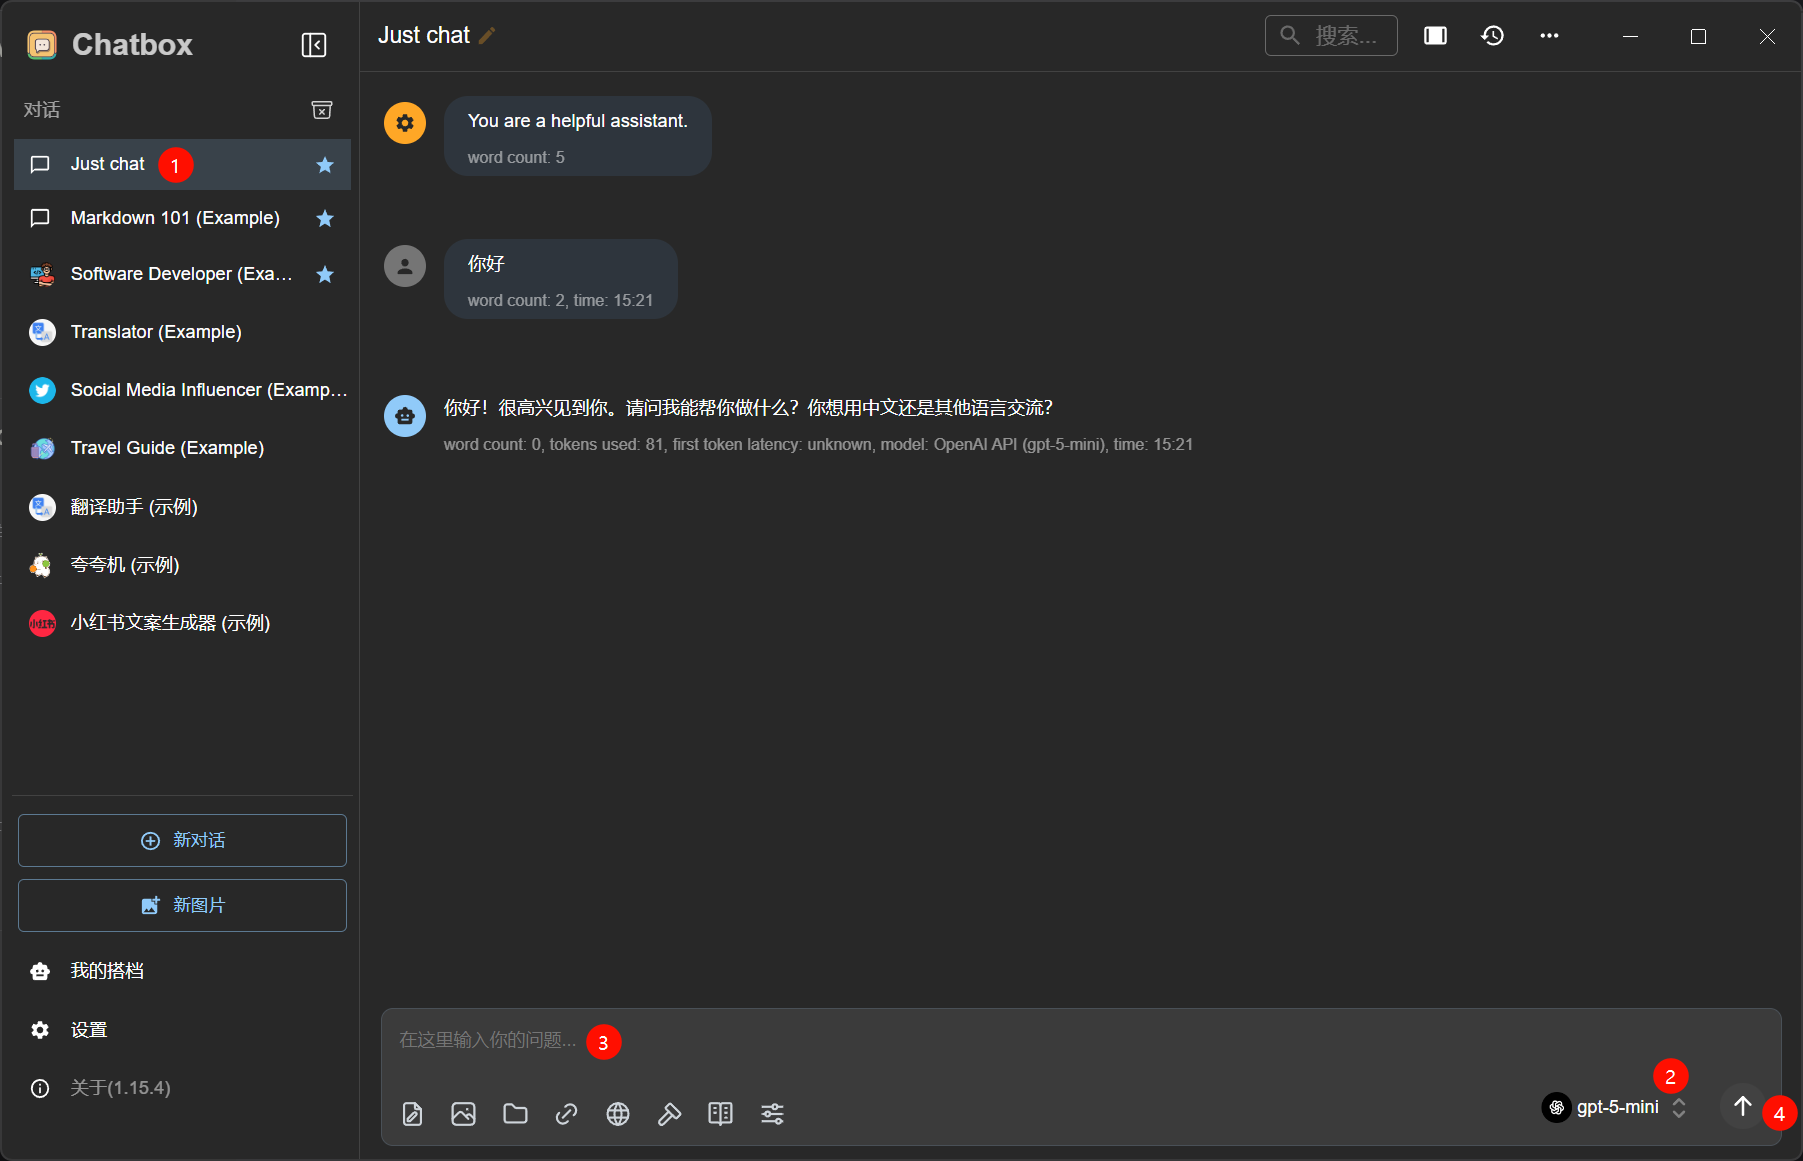
- Usage method: In Chatbox, click the "Settings" button in the lower left corner, select the "Model Provider" tab, click the "OpenAI" button, paste the API key, enter the API host, click the "Get" button, and check the models you need.

- Usage examples:
- Detailed usage instructions, please refer to the Chatbox AI User Guide
3.3 Using curl
Replace sk-xxxxxxxxxxxxxxxxxxxxxxx with your actual API key.
curl https://api.yixia.ai/v1/chat/completions \
-H "Authorization: Bearer sk-xxxxxxxxxxxxxxxxxxxxxxx" \
-H "Content-Type: application/json" \
-d '{
    "model": "gpt-5-mini",
    "messages": [
        {
            "role": "system",
            "content": "You are a helpful assistant."
        },
        {
            "role": "user",
            "content": "你是谁?"
        }
    ],
    "stream": false
}'
3.4 Using python
Install Python【truncated】
Install openai SDK:
bashpip install openaiWrite Python code: main.py
pythonfrom openai import OpenAI client = OpenAI( # 从环境变量获取 # api_key=os.environ.get("OPENAI_API_KEY"), # base_url=os.environ.get("OPENAI_BASE_URL"), # 官方默认:https://api.openai.com/v1" # 直接填写, 将sk-xxxxxxxxxxxxxxxxxxxxxxx 替换为实际的API密钥。 api_key="sk-xxxxxxxxxxxxxxxxxxxxxxxxxx", base_url="https://api.yixia.ai/v1", timeout=60, max_retries=3, ) message = [ { "role": "user", "content": "你好" }, ] completion = client.chat.completions.create( model="gpt-5-mini", messages=message, ) print(completion) print('-'.center(50, '-')) print(completion.choices[0].message.content)Run Python code:
bashpython main.py
3.5 Using JavaScript/TypeScript
Install Node.js【omitted】
Install openai sdk:
bashnpm install openaiCreate a file named main.js and add the following code:
javascriptimport OpenAI from "openai"; const client = new OpenAI({ baseURL: "https://api.yixia.ai/v1", apiKey: "sk-xxxxxxxxxxxxxxxxxxxxxxxxxx", timeout: 60000, maxRetries: 3 }) const resp = await client.responses.create({ model: "gpt-5-mini", input: '你好' }) console.log(resp)Run JavaScript code:
node main.js4 Credit Recharge
When the credit is insufficient, the API cannot be used. At this point, you need to recharge.
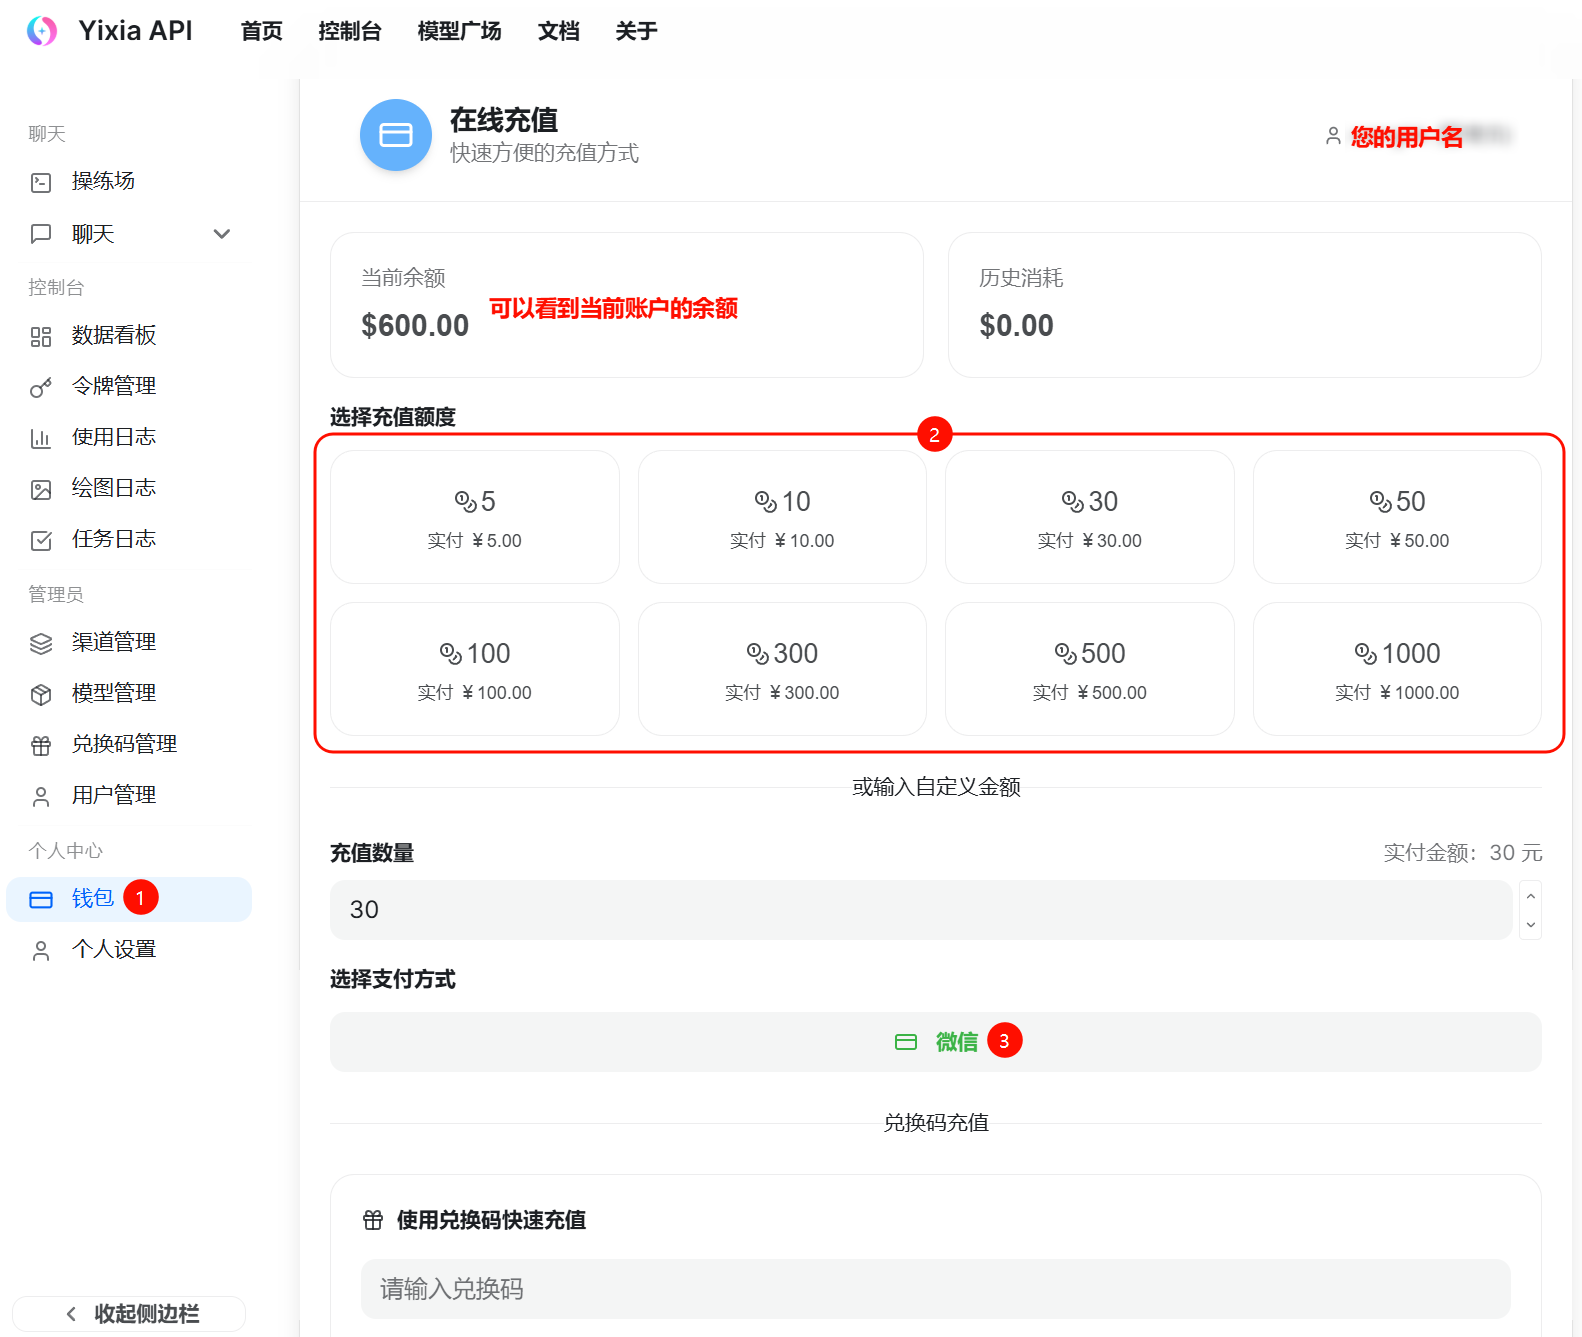
- Click "Wallet" in the left menu bar to enter the wallet page.
- Choose the recharge amount, then click WeChat to proceed with the recharge.
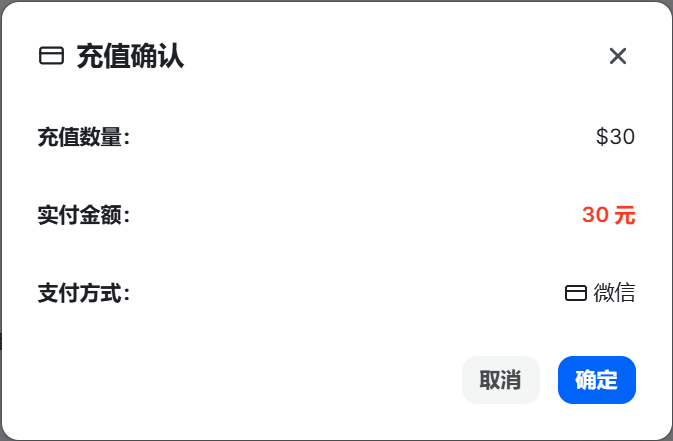
- On the pop-up confirmation page, click Confirm to proceed to the recharge page.
- Use WeChat Scan to complete the recharge.
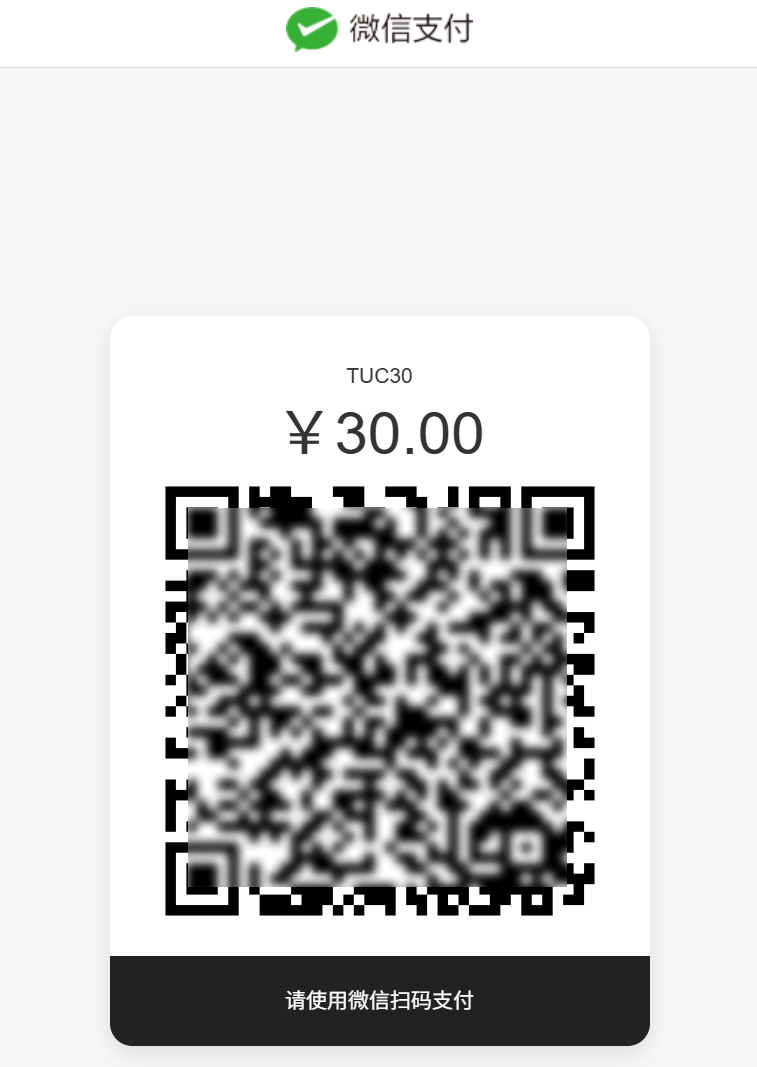
- After a successful recharge, return to the wallet page to see the recharged amount.
5、Use Cases
- Claude Code integrates Yixia API for magic-free domestic use, see details
6、Common Issues
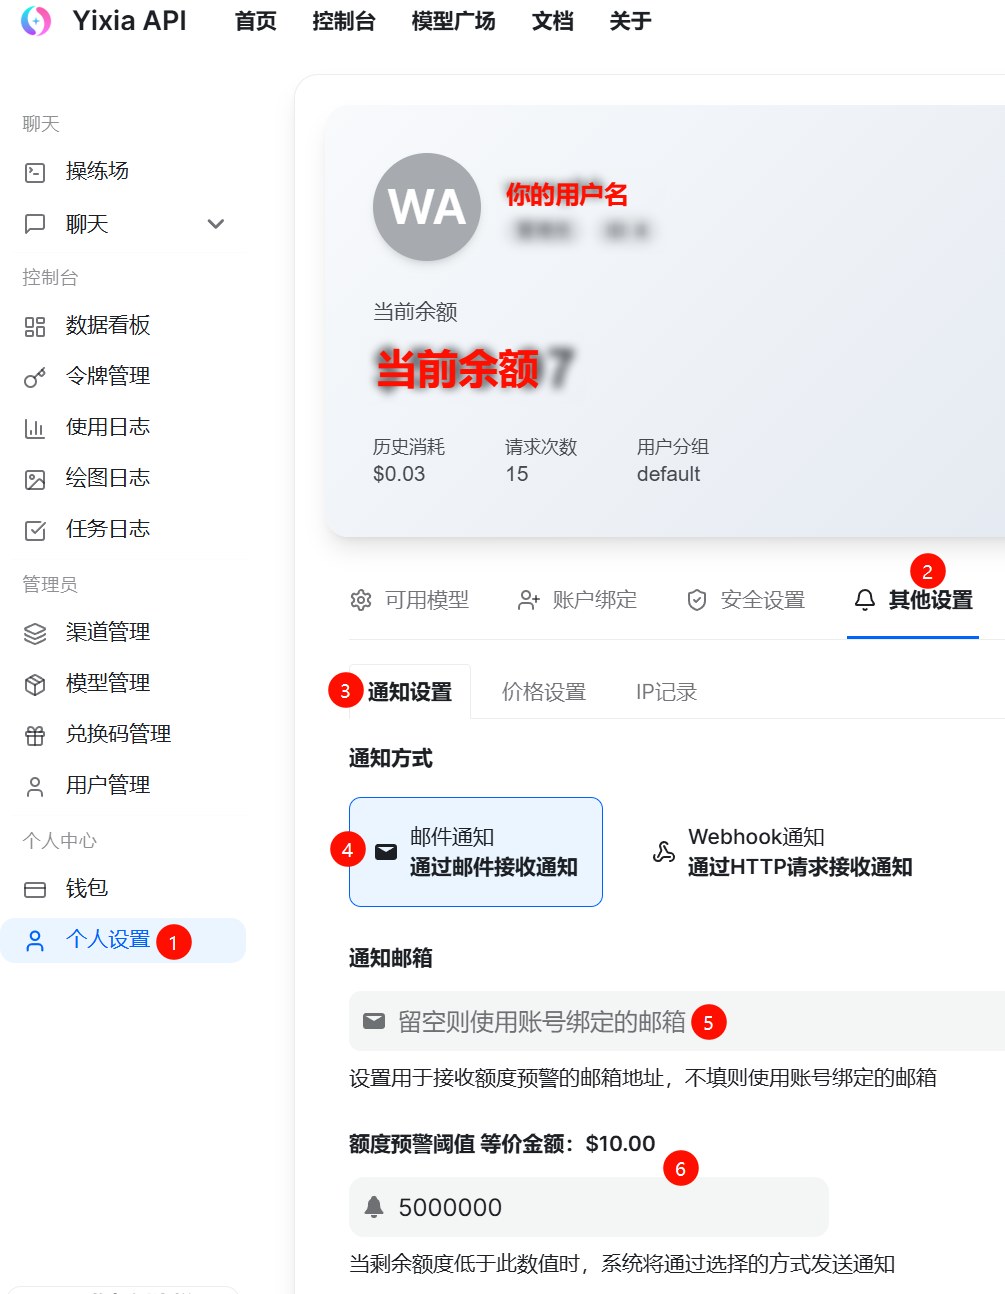
6.1 How do I get notified when my quota is insufficient?
Log in to your account, click on Personal Settings, then Other Settings, Notification Settings, Email Notifications, enter the credit alert threshold, and save, as shown below:
6.2 Group default model XXX no available channels?
The model name is entered incorrectly. Please check the available models in the system: https://api.yixia.ai/pricing, then modify it to the correct model name.